11.30.2013

Everyday...Fly

Happy Saturday...

I did this canvas background awhile back. I decided to see how a background would come out by placing the canvas on my gellii plate. I'll definitely do it again. Thinking about getting the larger gelli plate so I can do some larger canvases.

I mod podged the butterflies on then got out my Portfolio water soluble oil pastels and added some color. Doodled with my Signo white pen and just a black ball point pen...Used a stencil for the letters then called it done...


I hope you find a way to Fly...Everyday.

x0x0x
Monica

11.26.2013

On the Wings of The Butterflies

Hope Floats on the Wings of The Butterflies...what more can I say.

I love butterflies, I get so excited and awwe struck when I see them. I always want to be around them.

I love working with the gelli plate and the different effects that come through. Someone commented on a post on facebook and said it reminded them of stained glass. I totally love that and now see it in a different way. 


x0x0x
Monica

11.23.2013

WINGS....We ALL have them

Happy Saturday...

I actually did this gelli print back when I first got my Gelli Plate...I've probably looked at it, and many other prints I've done, 100 times or more.

It's always funny to me how you can do that, look at something so many times, and not see the finished page, then all of the sudden, there I am, stamping and doodling and painting and it all comes together.

I used a large Unity butterfly stamp, which I totally love. I stamped white craft ink from stampin up, then used the Creative Inspirations pink embossing powder. The sparkle and shine that embossing powder brings is like nothing I've ever used before. Then I used a white pen to outline all the detail and really make it pop.

I love how it came out. I am in the process of designing a journal cover to create a gelli journal with all of my pages, one that I can continue to add to.

Here is the finished page, and detail of the amazing embossed butterfly below...


Have a great weekend.
x0x0x
Monica

11.22.2013

A shabby Christmas Banner

Hello everyone.I decided I wanted to make a banner for my project this week to hang on the mirror over my fireplace and I wanted it to be shabby to go with my decor.

I started with burlap and heavy card stock. After cutting the burlap base, I cut the card stock smaller than the burlap, then crumpled it in my hand. I painted two coats of Creative Inspirations Tan for the base. After it dried I used Tim Holtz vintage photo with the blending tool over the high spots on the wrinkled paper, then some soot to bring out more depth. I then used a paper punch to achieve the lace look edging and used my fingers to cover that with white Gesso, then highlites of Creative Inspirations Ivory.

I sewed the paper to the burlap, this was a challenge. Burlap is not easy to sew on but I was determined.

I then stamped the circular lace onto cardstock with Tim Holtz vintage photo, then cut out the edges and center and sewed it to the burlap and paper banner piece.


The blue in the middle lace stamp is painted with Creative Inspirations Turquoise,  which I then stamped over with white gesso to bring out the detail. Lightly rubbed some vintage photo over that. The typewriter key letters are just printed from online.


I dry brushed the flower trim with the Tim Holtz vintage photo, then brushed over that with the Creative Inspirations Tan...


As always, the shimmer on these pieces is amazing and I love how it all turned out.


11.12.2013

Love Grows Here

A Gelli print journal page...husband had just had surgery, it was a long 2 days and I just needed something uplifting...
Art always makes me feel better. It's such a great way to release negativity and find something positive in any situation.
Its been a long 3 months since the motorcycle accident and my husband has dealt with some serious pain, and even 2 days after the surgery I could see a change in him. Even though he was in pain from the surgery, he could finally see a light at the end of the tunnel. Doing everything I could to take care of him and make him comfortable and to finally see the hope in his face and the tone in his voice was so uplifting to me, and as hard as it's been I have loved taking care of him. Love grows here every single day, even in the tough times, it grows...


x0x0x
Monica

11.10.2013

FLY To The Beat Of YOUR OWN WINGS

This journal page and the quote is inspired by something my daughter shared with me. I googled the quote and found nothing which is way cool.

I love my daughter so much, love butterflies, and love my Gelli Plate...Those combined with an awesome quote and this is what you get. For Melissa


Thanks for stopping by...
Go Make some ART
x0x0x
Monica

11.08.2013

All Hearts Come Home

Happy Friday everyone!!!
I was feeling the Spirit of Christmas tapping me on my shoulder this week and decided to create a tag in a Christmas theme. My son lives too far away to be home for Christmas this year but I know his heart is always here, and mine with him....that is my inspiration for this tag. 

Here is a shot of the elements before I put the tag together...


The background on the tag is a gelli print that was originally done by the amazing Denise Phillips and sent to me as a swap gift. I brushed Sky Blue over the entire tag which brought out just the shimmer I was looking for, and I love that its transparent to still see the original print.

And the finished tag...


The house is heavy cardstock that I first painted with Blush, then I used a heavy modeling paste and a stencil for some texture. I painted the paste after it dried, first with Sage, then over that with Mint.

The roof is just corrugated cardboard, painted with Chocolate, then highlights of Burnt Sienna. The snow on the ledge of the roof is a paper doily edge painted with Winter Frost.

The tree was just free hand cut from scrapbooking paper and painted with Spring Green, and the Star is painted with Bright Yellow. I sewed around the edges of the tree, and also the tag, then glued little plastic Christmas tree lights onto the tree.

I used the Deliquesce Super Sparkle Pink on the door and the heart. This is the first chance I have had to use the Deliquesce and I LOVE IT...

I doodled on the print of the tag and the house with a white gel pen then just glued everything down.

Here are the colors I used.


Hope this gets you in the mood for the upcoming Holiday's. 
x0x0x
Monica

10.25.2013

Do You Believe?

Hi Everyone and Happy Friday!!!!

Do you Believe? I sure hope you do, and I hope you never give up on your wishes or dreams.

I love wish fairies, I have never looked at them as weeds. There's just something about being able to take something from nature, and send it off in the wind full of wishes. To me they are magical and I wanted to do a journal page that was just as magical.

The CI Paints brought such a shimmer and added element of magic to this page and I just love how it turned out.


I did the background on and 8-1/2x11 piece of heavy card stock using Aquamarine, Sky Blue, Turquoise, Rose Quartz, Blush and Buttercup. I just kept layering until I achieved what I was after.

I love the way the colors blend...

Next I designed the wish fairies. I actually used chipboard shapes and just arranged them on a piece of heavy card stock then traced around them and cut it out as one piece with an exacto knife.

The greens of the stems were done with Emerald and Green Olive. I used fairy dust as a first layer on the wish fairies...I then glued the piece down to the back ground. Then I mixed Blue Ice with my Liquitex Coarse Texture Gel and applied it using a stencil and palette knife...after that dried I went over the fairies with another layer of the Blue Ice...glued a crystal in the middle of each and it was done.

Here are the colors I used


Have a MaGiCaL Weekend!!!

x0x0x
Monica


10.20.2013

Take Flight

Finally finished this 6x6 canvas this morning. I started it a couple of weeks ago. Trying to do a series of 4. This is the 2nd...the first one is the Journey canvas I posted previously.

Really happy with how they are coming out...


Thanks for stopping by.
Have a FaBuLoUs day
x0x0x
Monica

10.17.2013

My first Creative Inspirations Paint Design Team Project

So thankful and excited to be a part of the Creative Inspirations Design team and very excited to use these amazing paints.

If you know me at all, you know I am all about color. I love having so many different color choices with these amazing paints. They are awesome to work with and blend so great. The shimmer factor is amazing.

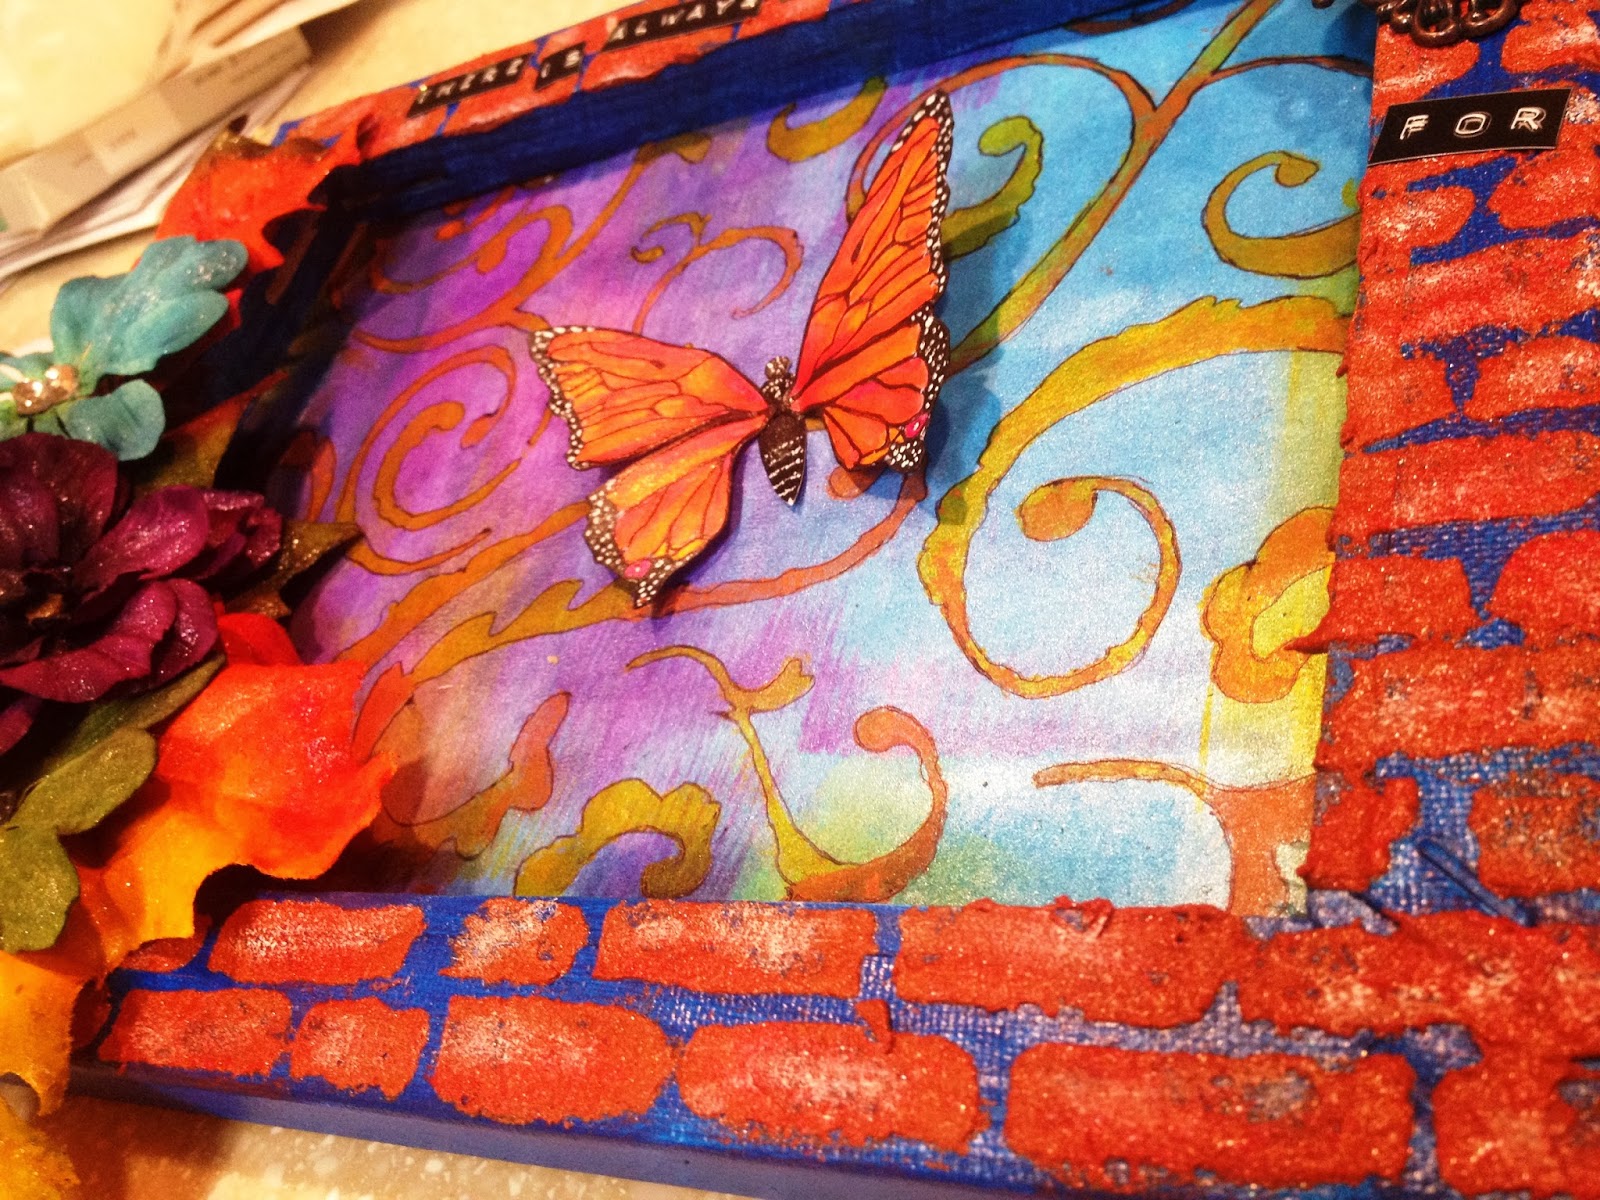
I did this project on the back side of a canvas because I wanted dimension.


The background is done on my Gelli Plate using Royal Blue, Aqua Marine, Turquoise, and Plum.

I placed a stencil over that after it dried and used Buttercup and Pumpkin for the swirlies. I used a dry stipple brush to apply the paints with the stencil. I outlined the swirls with a black ball point pen.

On the flowers, I used Plum, Aqua Marine, Fuchia, and Evergreen. I also used the crystals in the center of the flowers. I also used the crystals on the Tim Holtz ornate frame.


On the leaves, I used Evergreen, Buttercup, Fuchia, and Pumpkin. 
The outside of the frame was painted with Sapphire.


For the bricks I used a brick stencil and Liquitex Coarse Texture Gel. I mixed Burnt Clay, Chocolate, and some Garnet into the texture gel before applying it to the frame. These colors stayed true and shimmery even with the blending of the texture gel...Amazing!!!! I then just used my finger to add depth and highlites with the Garnet, and some white gesso after the texture paste dried.


The butterfly was a print out that I cut into 4 individual wings. I printed it out on white heavy cardstock then filled in the outline. I used Garnet, Fuchia, Pumpkin, Buttercup, and Onyx. I used a white signo pen for the white dots and highlites on the butterfly.


Here are the paints I used...


 I hope this project inspires you and serves as a reminder that There is Always Something to be Thankful For.
x0x0x
Monica

10.14.2013

Creative Inspirations Paint Give-Away

Hey everyone. Really excited to share this with you! Creative Inspirations Paint is having a giveaway! It's in honor of the new design team as we wait for our reveals. 

Stay Tuned!!! My first post goes live Thursday, Oct. 17! Woo Hoo!!!

To celebrate and waiting to see the new DT members reveals lets have a fun giveaway!! 
All you have to do is share on the facebook and here on the blog http://creativeinspirationspaint.blogspot.com/ your favorite CIP color! Every Sunday for the next 2 weeks we will be drawing names for 2 people to win their favorite CIP color!
Each day you leave a comment on the blog or facebook one a day per person on facebook, blog or both your name will be entered into the drawing for each day!
That means you have a chance for your name to be added 14 times for a chance to win, if you leave a comment each day on the blog and facebook!
The 2-winners will be announced Sunday night 10pm CST!
What's your #1 favorite Creative Inspirations Paint color?!
Go!!

x0x0x
Monica

10.12.2013

What a Week!!! And now for some studio time!!!

Whew...happy for the weekend...started my permanent schedule at the new job...getting up at 5 am is going to take a little more getting used to but I LOVE getting off at 330!!! awesome week and so much to be thankful for and look forward to.

Also received my Creative Inspirations paints and today, (insert SQUEEL here) after a trip to Hobby Lobby, I will be in the studio working on my first DT project. Very excited to get to use these amazing paints and I am looking so forward to the end result!!!

STAY TUNED!!!!

Have a FaBuLoUs EVERYTHING!!!!

x0x0x
Monica

10.06.2013

Be Your Beautiful Self

Starting this new job has been so exciting, and its also made me nervous, and kind of, just kind of insecure.
It's been so long since I've worked in a corporate environment with a lot of people. I just need to remember to be myself so I decided to do a journal page and share it to remind everyone to just Be Your Beautiful Self.


It's a gelli print background. The border is done with some left over borders from one of Nancy Baumillers kits at Crowabout StudioB at deviantscrap.com, and also some washi tape. I used india ink and my calligraphy pen to write in the words and the heart. The Be and Beautiful are a foam stamp and I used a letter stencil and white paint for the other words. Fun Stuff.

Thanks for stopping by...
x0x0x
Monica

10.03.2013

There are NO RULES in Art

Earlier today, one of my facebook friends, Nicci Dot C A, posted a colorful picture that said to Color Outside of the Lines...this has always been one of my favorite things to say, hear, read...etc...it inspired me to make this journal page using...BIG SURPRISE...hehe, one of my Gelli prints...

It's so important for EVERYONE to remember there really are no Don'ts...or NO RULES in art...and apparently DON'TS isn't even a word LMBO...awesome...that makes it even better...

I really hope that someday, when I am not here anymore, to physically have an impact on some future amazing person, that my art will inspire them to just follow their soul and just let the brush or their fingers or whatever flow...just do it...just make art...with no rules...


Thanks for stopping by...
Hey tomorrow's FRIDAY...have a FaBuLoUs Weekend!!!!
x0x0x
Monica

9.29.2013

Gelli Journey Cards

In a previous post I showed pics of some prints I have sewn together for a book for my daughter.

She is on a roller coaster ride in life right now, a true test of her strength, and faith in herself, which she is struggling with. It's been a rough year and a half and it's all taking its toll. That's where I come in. I want her to have positive messages to reach for in her unsure moments, and know that they come completely from my heart and soul.

I so know what it's like to have low self esteem, to feel constantly judged, and to question ones self on way too regular of a basis...I want to make this easier for her to go through and also let her know that even when she doesn't believe in herself, or what the future holds, that I do, and I always will...

She will be moving back home after this semester in college is over mid December and I want to have it for her as a welcome home gift when she gets here. I will be posting my progress on getting this done for her.


Thanks for stopping by.
x0x0x
Monica